I just added a new awning over my back yard patio. The awning is made by Palmiye, with a high quality aluminum post and rail system that opens and closes using a Somfy motor. The awning has integrated LED lighting. I'll write up a separate post on the awning itself, the purpose of this post is to describe the control panel that I fabricated so that the awning and lighting would be integrated with my whole house Insteon system.
 |
| Completed Weatherproof Remote Insteon Control Panel for Patio Awning and Lights |
 |
| The completed Palmiye Awning with Control Panel (upper left corner). LED Lights are the white globes. |
Insteon makes a small awning control module with an open close two pole switch which could have worked in my installation, however the Insteon Remote Control Micro Open/Close Module is rated for up to 2.5 amps (motor) and this awning is right at the limit with 2.5 amps on the nameplate. So I decided to use two separate Insteon On/Off DIN Rail Modules to control the awning open/close function. When I purchased the awning, I specified the electrical control option instead of the Somfy remote option - so I could simply control the awning by switching the 120V leads using the Insteon modules, instead of having to perform a Somfy automation to Insteon network interface.
 |
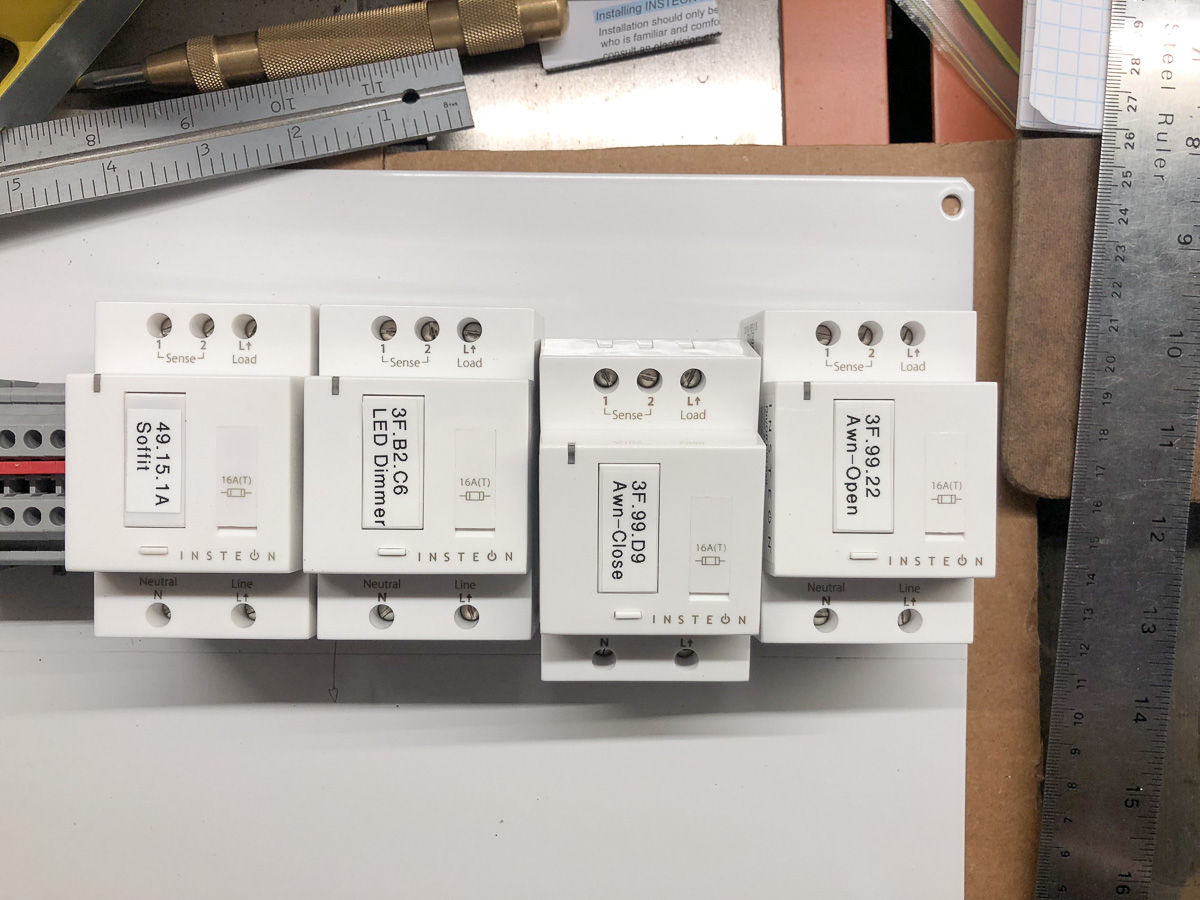
| Laying out the Insteon DIN Rail Modules on the panel base plate |
I also needed to control the LED lights integrated in the awning structure. This awning had an array of 12 LED lights, each drawing approximately 3W. Total 12V power draw of 36W. The awning was supplied with a control panel constructed to european specifications - and the LED controller was designed to be Somfy radio remote controlled. I wanted my panel to be constructed with completely CSA / UL certified components, so I didn't use the LED controller supplied with the awning. I decided to go with an Armacost LED driver with voltage dimming capability, and then drive the LED driver with an Insteon DIN Rail Dimmer module. The fourth DIN rail module in the panel photo shown above is for the control of the soffit lighting - which is the 120V line feeder that I used to power the entire panel - so I wouldn't have to run a new feeder from my electrical panels inside the house.
 |
| Insteon DIN Rail Modules next to Phoenix Contact terminal blocks |
I like using Phoenix Contact terminal blocks, so I arranged the panel so the 120V neutral and line connections were ganged together with a separator block. I arranged the DIN rail modules next to the terminal block to simplify the wiring and minimize the length of the runs - inputs on the bottom, output on the top of the modules.
 |
| Problem with the Insteon Modules - they will not clip onto a rail mounted directly to a flat surface!! |
I quickly noted the first design problem with the Insteon DIN Rail Modules - they will not clip onto a rail mounted directly to a flat surface!! One the rail is mounted - you have to slide them onto the rail from the end - the geometry of the module prevents the bottom clip from engaging on the rail! I've never seen this before on a DIN rail module for other automation components. Solution - I had to space the DIN rail above the bottom panel.
 |
| Using washers to lift the DIN rail from the back panel to allow the Insteon modules to clip on / off the rail |
 |
| With the DIN rail shimmed off the back panel with washers, the Insteon Modules will now clip on and off the rail |
Why is this important? Insteon modules don't have particularly high reliability - I've had to replace about 10 insteon modules of various types in my installation over the past 10 years. Not being able to clip these on and off the rail would have meant having to remove the back panel from the fibreglass enclosure, disconnecting and removing all the modules to get at a module near the center of the panel. This is a design aspect that should be corrected by the Insteon team.
I then arranged the wiring channel around the Insteon modules and Armacost LED driver as shown below for a neat installation.
 |
| Wiring the Insteon On/Off and Dimmer DIN Rail Modules |
This is where I found out how poor the screw terminals are on the Insteon DIN rail modules - they consist of flat headed pins that "drill" into the wire inserted in the connection slot - and only work well with solid core wire. The pins will split multistrand wire and give you a poor connection. There is no comparison with the Phoenix Contacts terminal blocks - which use a flat clamping mechanism instead of a pin - and work quite well with multistrand wire. In addition - the Insteon flat head slots are quite wide - so they don't work well with a terminal block screwdriver. The terminal block screwdriver fits loosely in the slot - and doesn't take tightening torque very well. The feel of these screw terminals on the Insteon modules is very "consumer grade" - it is not confidence inspiring and not very nice to work with - you don't get the feeling that you are working with a well designed product.
One other comment on the Insteon DIN rail modules - they are HUGE. If these modules could go on a diet and lose 3/4" in width at least - then you would be able to pack a decent number of modules in an enclosure. As it worked out in my case - I needed 4 DIN rail modules and I needed a fairly large enclosure to accomodate them.
 |
| The completed and installed control panel. |
Conclusion
Well - how does it work? Quite well. I wrote a few simple programs to ensure that if one of the modules controlling the Somfy motor is turned on - the other would be switched off by the program to ensure I'm not feeding both leads of the motor at the same time. I have to tune up the ISY 994i controls a bit to ensure that the retry commands don't interfere with the program just mentioned. The DIN rail dimmer and Armacost drive work GREAT - no LED flickering, just a real nice and smooth full range dimming adjustment.
Does anyone else have comments about these DIN rail modules? Write a comment below - I would love to hear about your experiences. Insteon - if you're listening - these DIN Rail modules are good - but they could be great by making them narrower, by improving the clip interface on the bottom, and by improving the quality of the screw terminals so that they work better with terminal block screwdrivers, and work with stranded wire.
Sources and Links
I hope you found this post useful. Feel free to ask questions in the comments section below. I answer all questions. If you're interested, you can help support this site by using
the following links to Amazon.com in the United States. My go-to place in Canada for Insteon automation components is Aartech.ca. I purchased the Armacost driver from Lee Valley Tools. The waterproof enclosure was purchased from Westburne - my electrical wholesaler.


Great article, very informative post.
ReplyDeleteOnline gaming platforms are growing fast.
online real money game – Cheak Game sites